As 2020 winds down, it’s time to start thinking about submitting your list numbers to the Illinois Ornithological Society’s Listers Corner. State Life Lists, County Lists, Big Days, Site Lists and many, many more. Whether you submit in one category or dozens, we want them all. If you’re wondering what the categories are, simply visit IOS Listers Corner and browse away. This has been another exciting year, with state first records and other species that haven’t been found in Illinois for decades.
Need help putting your lists together? We have some list blanks that many have found helpful: 1) the 2020 Listers Corner Blank Form, for those who prefer to send in their lists via snail mail, 2) a County Ticks Excel sheet which will automatically add up your county totals by region, 3) a simple Illinois List blank form, in either Excel XLSX or PDF format, and 4) a Total Counties per Species (TCPS) Excel sheet that is the easiest way to keep track of your county lists.
At the beginning of the year, I wrote to you that Meadowlark publishing would be temporarily suspended due to the resignation of our chief editor, Sheryl DeVore, along with field notes editors, David Johnson and Steve Bailey. Sheryl, David, and Steve were longtime volunteers with the Illinois Ornithological Society (IOS) and we wouldn’t be where we are today without their leadership, dedication, and considerable efforts. If you were to open the very first issue of Meadowlark published in 1992, you would find Sheryl’s and David’s names inside. Over the next 25 years, each played a significant role in not only producing this magazine, but driving IOS forward. For this, we are eternally grateful. We thank them for their many years of service and will miss them greatly.
I also mentioned in that same letter that, if we’d like to see this journal continue, we needed to recruit and assemble a new staff of invigorated volunteers. To that end, the board and I searched for, identified, and brought on several fresh faces including Jill Anderson and Matt Hayes. Jill has been a long time supporter of the IOS grants program and has previously contributed articles to Meadowlark. We welcome her as the new fall field notes editor. Prior to joining IOS, Matt Hayes served as Wisconsin Society of Ornithology’s Research Committee Chair. We welcome Matt as the new breeding season field notes editor. Finally, we selected Eric Secker as our new chief editor. Eric brings a wealth of talent and experience to our staff as a designer in both print and digital media. We couldn’t be more excited to have all of them on board.
Our goal has always been to produce an engaging quarterly magazine, documenting the status of birds and birding in the state of Illinois while highlighting your seasonal field notes, photos, and original drawings, as well as technical papers on local avian studies. Over the past few years, the IOS Board and I realize that we have fallen woefully behind in our obligation to publish on time. To rectify the situation, our newly assembled staff have put together an aggressive plan to get caught up. Arriving soon is the first of several issues in support of that effort. In addition, we have completely redesigned Meadowlark’s look and feel. We think you’ll like what you see and read not only in the first issue, but future issues coming soon.
Now, more than ever, we need your support to continue not only Meadowlark, but also our many valuable programs – Illinois Young Birders, Research Grants, and our one of a kind field trips. Help us achieve our goals in bringing IOS all the way back. We want you as an active participating member. Why not renew your membership today?
Matthew Cvetas
IOS President
Greetings birders,
For those who don’t know me, my name is Eric Secker and I am the new chief editor and designer for Meadowlark magazine. I’m excited to announce that we are getting back on track and quickly working through back issues to get caught up to 2019. This week, the first catch-up double issue of Meadowlark will begin arriving in the mail to both current members and individuals with memberships that lapsed during the time there were delays in production. In addition to getting caught up, I’m very excited to share that future Meadowlark issues will be in full color with photos filling more to the edges of the pages and a new expanded size magazine format. I can’t wait to share the first few issues with you.
If you aren’t already a member of IOS or have let your membership lapse, now is an excellent time to join again so you don’t miss out on what’s to come. Also, I need your help through your contributions and the contributions of many other volunteers. Together, let’s make Meadowlark the Illinois birding journal for showcasing the sightings, stories, data, and research going on in the Illinois birding community. If you have questions, comments or feedback, or want to volunteer, please reach out to me. You can learn more on the Meadowlark Journal Info page.
The 2018 Listers Corner is now up and available for viewing! From Yard Lists to Big Days, there’s something for every birder.
Special thanks go out to the Listers Corner Committee, who compiled all the information: Joe Lill (Chair), Mike Madsen, and Jim Mountjoy and Webmaster, Greg Neise.
We’re already looking forward to seeing what transpires in 2019!
The Illinois Ornithological Society (IOS) has been going strong for more than 25 years, long before I first raised my binoculars in the prairie state. IOS was founded by a group of like minded individuals who shared a common goal of wanting to document the status and distribution of our birds. At the time of its inception, IOS filled a niche, creating a statewide organization that could galvanize a broader birding community. The medium, which they chose to document bird life, we know now as the venerable, Meadowlark, a scientific journal that has provided engaging content, beautiful locally sourced artwork and photos, thorough seasonal field notes from contributors across the state, as well as avian research articles from IOS grants recipients.
The effort it takes to produce one issue of Meadowlark is vast. Countless hours are spent by a few dedicated volunteers chasing articles and photos, compiling seasonal data, and laying out the publication. Because of a limited number of resources and the substantial amount of time it takes to produce seasonal field notes from an explosion of data in recent years, we have fallen well behind our desired publishing schedule. On top of this, we recently accepted the resignation of our talented editor, Sheryl DeVore, along with field notes editors, David Johnson and Steve Bailey. All of them are long time volunteers with IOS and we wouldn’t be where we are today without their considerable efforts. We thank them for their service and will miss them greatly.
I would be lying if I said the future of the magazine were anything but uncertain at this time. Have you ever heard of the saying, “If you want something done, ask a busy person to do it?” Well, that has been the case for many years with IOS. We have continued to rely on a small pool of dedicated volunteers to produce this journal that are now no longer available. If we’d like to see the journal continue in its current form, we need to assemble a new staff of invigorated volunteers. IOS needs you to help us fill that void now. Until we have the right people on staff and a plan to go forward, I regret to tell you that MEADOWLARK PUBLISHING WILL BE TEMPORARILY SUSPENDED.
The IOS Board is hard at work evaluating all of our programs including Meadowlark and putting together plans to take this organization forward. Everything is on the table and we would love your input on how best to proceed. After all, this is a membership organization and every voice counts. To that end, we implore you to COMPLETE OUR MEMBERSHIP SURVEY. It will only take 5-10 minutes of your time and will provide us valuable insight.
In my next communication to you, I hope to have some resolution to this issue. In the meantime, if you have an interest in joining our team, contact us and get involved today. I promise that you won’t regret it.
In this fourth article (Part I) I’d like to address a more technical topic-that of shooting modes. In my first article I advised that you begin your photography journey in Program mode-the automatic mode that lets your camera choose your aperture, your shutter speed and your ISO setting; in other words the camera controls the exposure triangle. I recommended this because the exposure triangle can be confusing and overwhelming when we first begin-and often turns folks away from photography in my opinion. But as we advance we learn that artistic interpretation begins with controlling these factors ourselves.
So let’s talk briefly about the exposure triangle. Aperture is basically the size of the shutter opening in the lens that lets light onto the camera sensor (which records the image). It is similar to the pupil of your eye-which can open and close to allow a comfortable amount of light into your eye. This size is designated by an f number (or stop). f4, f5.6, f8, f11, f16 being the most common f numbers (or stops) used across brands/models. Counterintuitively, the smaller the f number the wider the shutter opening (f4 being a wider opening than f22).
The final effect of aperture on images is in Depth of Field-the area of the image that is sharp from front to back. The smaller the f number, the less depth of field. Less depth of field in portraiture (which is often what we are doing in wildlife photography) creates an effect called bokeh. Bokeh is the visually pleasing level of blurriness surrounding our central subject. Bokeh directs our attention to the main subject-the portrait of the bird.
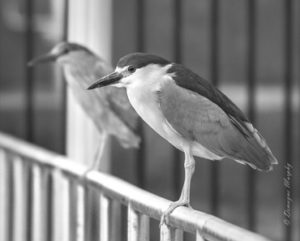
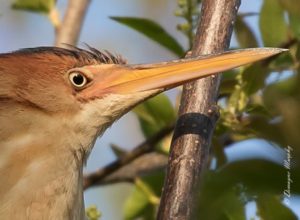
Black-Crowned Night-Heron and juvenile F5.6 and 1/250, ISO 2000
This image illustrates the use of bokeh-a less distinct background that lends almost a painterly effect. This was purposeful and achieved with the smallest f stop my lens offers at this focal length.
Shutter speed is the length of time that your shutter remains open, allowing light to pass onto the sensor. Shutter speed is measured in seconds or fractions of seconds. 1/4 means a quarter of a second. 1/250 means one two hundred fiftieth of a second. 1/4 being a longer exposure than 1/250.
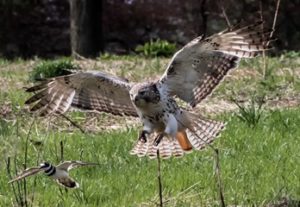
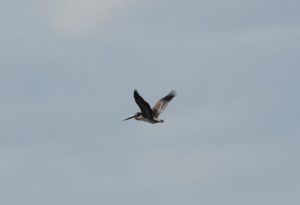
The final effect of shutter speed on images is motion blur. The faster the shutter speed the more likely that your camera can “freeze” the action of your subject-capture it in a sharp way. Slower shutter speeds are less able to freeze motion. There are certainly artistic reasons, even when photographing wildlife-for wanting to blur our subject. This can lead to appealing effects of motion and light. But more often than not we’d like to freeze a bird in action so that the image is sharp and clear. The image of the hawk below illustrates a shutter speed fast enough to freeze the action (1/1250) without blurring of the wings. This shutter speed was possible because there was sunlight available and because I increased my ISO to 1250. (The lack of absolute clarity was due to camera motion from not using a tripod-see my prior article on this site!! Though an exception to the tripod caveat ((seems like there’s always an exception in photography)) is that had I been carrying a tripod I would probably have missed the shot altogether. This scene exploded unexpectedly while I was walking by and I would not have had time to set the camera/tripod up. Wildlife photography seems to be a wonderful mix of absolute boredom at times opposed by fortuitous happenstance!)
Red-tailed Hawk chasing Killdeer f9 and 1/1250, ISO 1250
In this image, because I needed both the killdeer and the hawk to be in focus I needed to use a larger f stop (f9). Aperture here was my prime consideration because the magic of the photo was being able to see both birds clearly. Had the wings been slightly blurred due to the camera needing to choose a slower shutter speed (due to the higher f stop)I felt the image would still have worked.
To get correct exposure we are generally moving aperture and shutter speed in opposite directions. As we increase the opening of the lens-thereby letting in more light-the sensor requires that we shorten the shutter speed. Otherwise we would overexpose the image-too wide of an opening combined with too long of an exposure time—in both cases letting a lot of light hit the sensor for too long.
ISO is a standardized (across brands/models) designation for how sensitive the sensor is to light-similar to the old film speeds. Some folks think of it as the “light balancer”. In other words, most of us think of correct exposure firstly in terms of aperture and shutter speed and only lastly use ISO to balance out an exposure if need be. Base ISO is typically 100-that being the least sensitive. This number can increase dramatically however on most digital cameras-as high as 12000 or even higher. Higher ISO numbers allow for smaller lens openings (higher f numbers) or for shorter shutter speeds.
The final effect of ISO level on images is unfortunately that of digital noise. This is actually distortion of the image that looks like specks or graininess. The higher the ISO the more digital noise we get. Determining how much noise your camera creates at various ISO levels is primarily just trial and error. Many cameras can easily handle ISO levels up to 1600. Test your camera out to determine its limitations.
So exposure is always a compromise between these three elements of the exposure triangle-there are constraints to each of them and we often have to decide which element is the most important to our image.
So where does this take us in terms of shooting modes? Our choices are aperture priority, shutter priority or fully manual. Aperture priority (designated on your top dial as Av or A on Nikon) allows the user to choose the aperture desired and then the camera makes the correct exposure by choosing the shutter speed for you. Shutter priority (designated as Tv in Canon and S in Nikon) allows the user to choose the shutter speed and then makes the correct exposure by choosing the aperture for you. Manual mode (designated as M) requires you to choose both aperture and shutter speed, which can be very difficult during times of unpredictable motion of your subject.
My experience has been that wildlife photographers use Aperture priority the most often. This is not to say that Shutter priority or Manual are never used-as there are certainly scenarios that call for these modes. But my experience has been that especially as beginners we can safely use Aperture priority for most of our shooting. Why is this?
When sunlight is plentiful I think the easiest (and quickest way in the field) to achieve correct exposure is to shoot in Aperture priority mode. The camera only requires one input from you and this number can be changed quickly if your subject or conditions change. Also, because I like portrait bokeh the first thing I think about is what f number do I need in order to keep the bird sharp but the background blurred. Again, the smaller the f number the less foreground to background sharpness we get. On my 100-400mm zoom lens my smallest f number is f4.5-and I have usually found this number to be perfect for the smaller songbirds (warblers, sparrows etc). As my subject gets larger-say a duck-I then increase my f number-maybe to f8.
The other advantage to starting with the largest shutter opening that suits my subject (the smallest f number) is that the larger the lens opening the faster my shutter speed which is critical for birds that are moving. Remember, if I pick a large aperture then my camera will move shutter speed in the opposite direction-choosing a faster shutter speed-to balance out the amount of light hitting the sensor.
Additionally, because your camera is more limited in f number options than it is in shutter speed I find it best to control aperture first. f4 or f5.6 may be the largest apertures available to me with the lens I am using-and I am often choosing this max so that firstly I can get faster shutter speeds and secondly to get the bokeh I want. I simply do not have the option to open the lens any wider. But many digital cameras have shutter speed options from 30 seconds to 1/8000 of a second-a huge range to choose from. Also, an image can generally tolerate faster shutter speeds than strictly needed. In other words I can choose f4.5 because of the bokeh I want and the camera may choose a shutter speed of 1/500 or it may choose 1/750-either being fine if I don’t have too much subject motion. As long as 1/500 is enough to stop the action I really cannot tell the difference in the final image between 1/500 and 1/750, whereas with a small bird I can see the difference in bokeh between f4 and f5.6.
Finally what action should we take in terms of our final variable-that of ISO? We will continue this topic in Part II of this article where we’ll talk about Auto-ISO and Exposure Compensation to finish off our discussion of shooting modes. But in the meantime to get started with Aperture priority mode I would suggest one of two ISO settings. If you are shooting with plenty of available light you can probably leave ISO set to base which is most likely 100 on your camera. If available light is poor or you are moving between well-lit and badly lit conditions you will have better results using Auto ISO (letting the camera select the ISO number). Either of these ISO options frees you from having to consider this third variable much while you are shooting right now.
Using Aperture priority will let you experiment with bokeh and portraiture in a way that Program mode did not allow. See what you like. Do you prefer lots of bokeh or would you rather see plenty of sharpness throughout the whole image plane? It’s totally up to you and this mode will let you explore that. See you out there!
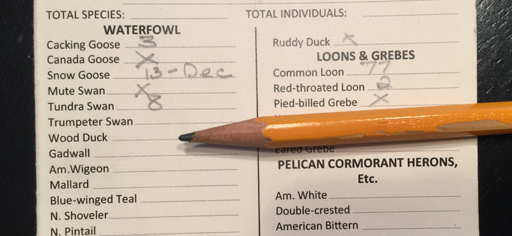
Prairie Falcon: Pike (Central) – In early December, a Prairie Falcon was in Pike County for a few days near the town of Seehorn.
White-faced/Glossy Ibis: Moultrie (Central) – A hunter reported seeing a White-faced/Glossy Ibis on Nov 23rd at a waterfowl management area close to Bethany in Moultrie County.
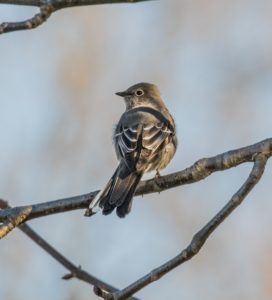
Townsend’s Solitaire: Cook (North) – On November 10th, a Townsend’s Solitaire was seen at Rosehill Cemetery in Cook County.
Upon first glance this photo, taken without any support, appears sharp. However, if we take a close-up cross section-below-we can see that it is disappointingly soft.
I’m going to start this third article by assuming you’ve now become hooked on bird photography. So on we go! You’ve tried lots of photos maybe using the beginning settings I laid out in last month’s article. Hopefully you’re getting enough light in your images. But maybe you’re still not getting acceptable sharpness? We could at this point address the Exposure Triangle-the interrelationship between Aperture, Shutter Speed And ISO-knowing that shutter speed is an important factor in sharpness. But I think we should first talk about camera support. I think this may ultimately be more important for most of us when talking about sharpness.
Most digital camera systems are still quite heavy. The Canon 7d MKII paired with the 100-400 MK II lens weighs in at about 5.60 pounds. A similar Nikon setup would also top 5 pounds. You are then expected to hold this horizontally for long periods of time while you are aiming and shooting. And don’t forget you still have to breathe during this process. So unless you are physically capable of holding this equipment rock steady you are going to get image blur to some extent. I learned pretty early on that even if I had enough light to get very fast shutter speeds I was still getting a slight softness in my images. And digital images are very unforgiving of blur. We can all easily enlarge images to see exactly how sharp a photo is. So even if you captured a fantastic image you will be disappointed if it isn’t tack sharp.
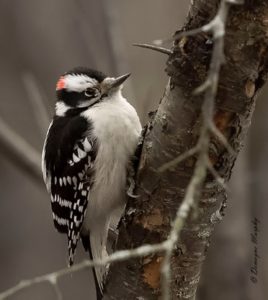
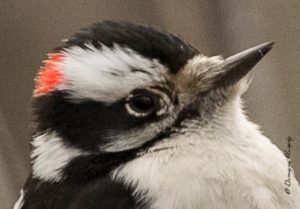
Downy up close by Demayne Murphy
This is not to say that it is impossible to shoot hand-held, without some sort of support. Some photographers do this amazingly well as you will see below. But for many of us it simply isn’t possible. This was a hard lesson for me to learn as I value mobility. I like to walk longer distances; I like to climb up on things or get down onto the ground for different vantage points. So carrying my rig mounted on a tripod just doesn’t appeal to me. However, frustration with unacceptable image softness finally forced me to at least make the compromise of using a monopod. And that is how I currently shoot; but I know that eventually I will need to shift to a tripod to get the sharpness I want in more of my photos.
A monopod has the advantage of light weight and easier maneuverability over most tripods. It also uses a simplified head-the piece that mounts the camera to the monopod so it is very easy to operate quickly. It does however lack the stability of three legs. This is the choice I would encourage you to make next. Invest in a monopod or a tripod. You should decide on the amount of stability you think you need (possibly based in part on your physical condition) vs. how important maneuverability/added weight are to your shooting style.
In spite of the internet advice available, I don’t believe it is necessary to start with something hugely expensive. My monopod costs roughly $90 plus another $115 for the head. The tripod used by Emil below costs about $279 in the carbon fiber version (very lightweight) and this includes the ball head. The aluminum version clocks in at about $150 including the same head. I have listed the models below. Yes, you can easily spend $700 on a carbon fiber tripod and another $600 for the head. But it simply isn’t necessary at this point. Aim for the quality you can easily afford. And save the rest of your money for a birding trip!
One thing you should take note of when purchasing a mono or tripod is the height of the support in relation to your own height. You want to be able to mount your camera and have the support extend vertically to a level that is comfortable for you to see through your viewfinder without bending down at all. And you should not have to extend the center column of the tripod all the way to its maximum to do this. When the center column is fully extended the tripod becomes unsteady with the weight of your camera perched so far above the three legs. So do take note of the height of the tripod with the center column maybe less than halfway extended. The other critical factor is the load capacity of the support. You must choose a model that can support at least the weight of your current camera/lens combo. If in doubt go up in support weight rather than down.
A lesser consideration would be how many leg segments the support uses and the type of locking mechanism for the legs. In terms of segments-the more segments the smaller the folded length-so it is easier to store and carry when folded up but the longer it takes to extend it in the field. Conversely, fewer segments take less time to extend but have a longer folded length. The segments will then be locked with either twist locks or flip locks. These factors seem to come down largely to matters of personal preference.
You must then purchase a head-the piece that connects the camera to the support. Monopod heads are quite simple in that they only need accommodate movement up and down. If you want to move your camera left/right you simply twist the whole set up. I would actually advise not purchasing some of the cheap tilt heads from Oben or Manfrotto-the under $100 category. Do spend a little more and get a 90 degree tilt head from Sirui or Kirk or Really Right Stuff (Sirui being the budget version of this trio-but highly acceptable.)
Tripod heads come in quite an array of styles-and prices. A ball head is what you are looking for (avoid pan and tilt or geared heads which are not suited for this kind of photography; and gimbal heads are generally used for 500mm or longer lens set ups.) Again, stay away from the under $100 heads.
Below I’ve included some additional examples of shots taken with and without supports so you can judge for yourself. See you out there!
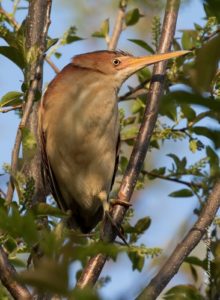
Least Bittern by Demayne MurphyLeast Bittern up close by Demayne Murphy
Canon 7D Mk II, coupled with Canon 100-400 Mk II.
Oben CTM-2400 4-Section Carbon Fiber MONOPOD, retail $90 and Sirui L-10 Monopod Tilt Head, retail $115
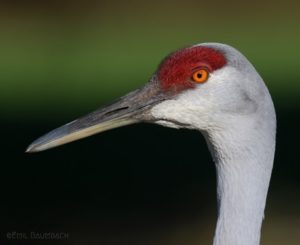
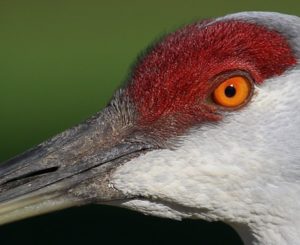
Sandhill Crane by Emil BaumbachSandhill Crane up close by Emil Baumbach
Canon 7D Mk II, coupled with Canon 100-400 Mk II and 1.4X telextender.
MeFoto Roadtrip carbon fiber TRIPOD (retail $269) which includes the MeFoto Q1 ball head.
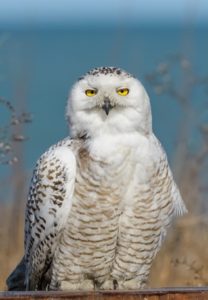
Given that there is always an exception to any rule I have included the below photo which was taken handheld. It is satifyingly sharp. But again-I think this to be the exception to the rule. Well done Leo!
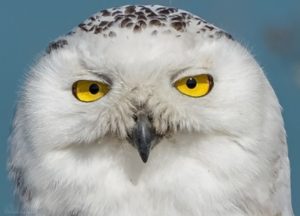
Snowy Owl by Leo EstradaSnowy Owl up close by Leo Estrada
Nikon D500 paired with the 200-500mm lens and HANDHELD.
I’d gone back and forth on coming to the Carlyle Lake trip. It was supposed to rain locally, and I didn’t know if it would be worth it. I knew a good front have moved in overnight, and I had hopes of some warblers and sparrows. After a sleepless night, I got up at 5 AM, already running behind. We were all supposed to meet up in Carlyle at 6:30 AM. It was an hour and twenty minute’s drive, and that didn’t include breakfast before or parking afterwards. Hurriedly grabbing almost everything I needed for the day (camera, binoculars, scope, tripod, water, etc.- y’all know the list) I left my snacks behind. The rain outside was a slight deterrent, but I assumed that it would lessen as I drove north to Carlyle. I was initially wrong about this.
The rain only picked up, and by Pinckneyville it was quite steady, forcing me to slow down for safety. As I drove through the dark, occasionally rolling down the window and letting the raindrops splash me to keep myself awake, listening to Paul Simon sing away on his Graceland album, my cruise control quit working and the check engine light came on.
Birding has always been escapism for me. If I don’t know what to do with myself, I just jump in the car and go looking for birds. I’m not always sure what to do to escape from birding- how do you go about escaping from escapism? My instincts were screaming at me to turn around, to turn back before I ended up breaking down on the side of the road. I was already running late- it was 5:50 AM- I’d slept only a few hours- surely it was too early in the morning for me to be safely driving in the rain?
Paul Simon’s song “Gumboots” came over the Bluetooth speaker:
“It was in the early morning hours
When I fell into a phone call
Believing I had supernatural powers
I slammed into a brick wall
I said hey, is this my problem?
Is this my fault?
If that’s the way it’s going to be
I’m going to call the whole thing to a halt.”
Then, as it often did, my stubborn streak overcame my anxiety. I turned off the music to listen for any weird noises, heard none, and put it back on. The car would pull through, or else. I was going to be late, but I wasn’t about to be VERY late. I’d paid to go on this trip, and I’d go on this trip. There was a good chance of a lifer Parasitic Jaeger or Brown Pelican out on the boat trip, after all, and I’d be furious with myself if I gave up then.
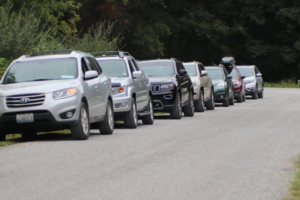
A Birding Caravan by Teresa Fouke
The rain broke near Carlyle, though as a reminder, gray clouds hung overhead, in the cool light of dawn. I pulled into the McDonalds parking lot where we’d agreed to meet up, at 6:40 AM. Everyone was already outside and I hurried over to join the group, spotting the familiar face of trip leader Keith McMullen as I did so. Keith drove at the head of the line of six or seven cars. Carpooling with him were Scott Latimer, Susan Miller-Zelek, and I.
Our first stop of the day was at the Dam West Boat Ramp, where a flock of Forster’s Terns greeted us. One of the terns in the flock was quite a bit darker and smaller- a Black Tern. Scopes were immediately trained on the flock of gulls on the breakwater, and further out where the terns foraged among the waves of the lake. If you turn 15 birdwatchers loose with scopes on any flock of birds, a rarity is almost certain to appear. This proved to be the case, as a Franklin’s Gull and two Herring Gulls materialized out of the flock of Ring-billed Gulls on the breakwater. Our most hoped-for bird, a Sabine’s Gull Keith McMullen had spotted the night before, failed to appear. However, eleven Little Blue Herons flying out over the lake proved a significant bonus.
Also, I’m going to give a shout-out to the Great Blue Heron that thinks he’s a gull and keeps landing on the breakwater and hunkering down with the gulls. I’ve seen him a few times now, and he never fails to amuse.
Having dissected the flock on the breakwater (visually, not literally) we got back in our cars and drove down the road to Eldon Hazlet State Park. Thousands of Tree Swallows swarmed over the fields on our way there, flying low due to the winds. It was a spectacle to behold, but it also indicated our biggest problem of the day- the weather. First came this wind- the warblers hid out in the bushes to avoid it instead of popping up to see us, though we did have a Blackburnian Warbler along the entrance road.
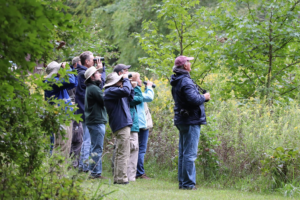
Birding Carlyle by Teresa Fouke
We found passerines in pockets out of the wind along the road, and soon we’d gotten great looks at Chestnut-sided Warblers, Black-and-White Warblers, Scarlet Tanagers, Magnolia Warblers, and many Rose-breasted Grosbeaks (about 30 at Eldon Hazlet!) Ospreys were constantly flying over the lake, and we noted one Canada Goose and Bald Eagle that seemed to follow us in the air. We hit upon one pocket that produced a Red-breasted Nuthatch, White-eyed Vireos, a Philadelphia Vireo, several American Redstarts, and more. We also got to hear a Barred Owl call, though we never saw it as it was hidden in the trees. On our way out, we had thousands of swallows fly low alongside the car- mostly Tree Swallows, although a couple of Barn Swallows and even a Cliff Swallow were noted.
The rains came in as we crossed over to South Shore State Park and looked at a couple of Cape May Warblers. We took a break for lunch and grabbed some fast food while it rained. After the rain passed, the wind picked up yet again as we went off to Keysport to look for the Brown Pelican. This was likely to be unsuccessful, as the Brown Pelican in question was about half a mile out, if it was there at all. While unsuccessfully staring into a mass of pelicans and cormorants on the islands half a mile out, Keith got a phone call from the boat rental. While not forbidding us to go out, they recommended that we stay onshore, as the high winds had stirred up up considerable waves that would leave us soaked and tossed about on the pontoon boats. Looking out at the comparatively shallow water in front of us, we could see whitecaps- and in the deeper waters we’d planned to boat on, the waves would only be stronger. A gust of wind sent a collective chill down our spines.
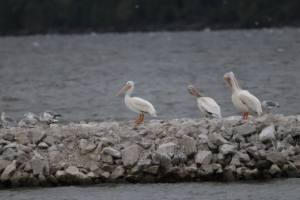
American White Pelican by Teresa Fouke
This was the point at which the Carlyle Lake Pelagic Trip became the Carlyle Lake Bi-State Trip. It was a fairly unanimous decision among the birders present to go over to Riverlands Migratory Bird Sanctuary in Missouri and see some of the shorebirds there, rather than grow wet and seasick on a pelagic trip. I ended up in the front seat, as Scott Latimer had to leave. We spotted a Red-shouldered Hawk on the drive over, and talked about how we first became interested in birding as the sun broke out of the clouds.
Riverlands was all we hoped for- the shorebirds were out and about, the sun was shining and it was in the 70s- absolutely perfect conditions. The long-staying Willet, Marbled Godwit, and pair of Ruddy Turnstones were clearly visible, if slightly distant. We talked to some of the local birders and scoped out the mudflats. Some of the group walked down along the edge of the fields and found a Sedge Wren. We also found three Baird’s Sandpipers sitting on the mudflats near the edge of the road, which provided excellent views of this species. A Peregrine Falcon flew down along the mudflat in front of us, and the Baird’s Sandpipers crouched down into the mud instead of flying. It worked, because the Peregrine missed them and continued on southwards.
We found an American Golden-Plover associating with some Blue-winged and Green-winged Teal, as well as a few Caspian Terns. Riverlands as usual was a joy to birdwatch, and going there was far preferable to being tossed about on a boat in the middle of Carlyle Lake.
Some of our group left us at this point, and the remainder drove back, yet again, to Carlyle Lake, looking out for that Sabine’s Gull again. The winds and rain had departed, and with the sun to our backs we scoped out the lake one last time. Unfortunately, the Sabine’s Gull refused to show itself, and so we went off to supper. Perhaps the day hadn’t gone as planned, but it was still a fun adventure and I had absolutely no regrets about going on the trip.
PS- I ended up getting my lifer Brown Pelican at Crab Orchard Lake in Williamson county, Illinois, a couple of weeks later. I didn’t expect to get that as a lifer in the Midwest, but after missing all of the previous five seen this year in Illinois, I was pretty thrilled to finally get a good look at one.
PSS- My check engine light has not turned back on since that trip. Fingers crossed!
Sage Thrasher: Woodford (Central) – On October 29th, a Sage Thrasher was photographed on a farm in Woodford County.
Neotropic Cormorant: Christian (Central) – A Neotropic Cormorant was found on October 15th at Taylorville Lake in Christian County.
Black-bellied Whistling-Duck: Sangamon (Central) – A Black-bellied Whistling-Duck was seen on Lake Springfield in Sangamon County on October 11th.
Brown Pelican: Williamson (South) – An immature Brown Pelican was discovered at Crab Orchard National Wildlife Refuge on October 3rd in Williamson County.
So you’ve decided to give bird photography a try! You’ve rented, bought or borrowed a digital SLR and a lens. Now what?
Remember, what you’re looking for right now is to find out if this art form is for you. You want to find out if you enjoy the process of photography. And the way to find this out is certainly not to shoot terrible photos, which is terribly frustrating-but it isn’t necessary to shoot National Geographic quality photos either. We’re all somewhere on the learning curve. Let’s focus on getting some acceptable shots that inspire us to keep at it.
A quick reminder here: birds are relatively small and they move around quite a bit-sometimes at very high speeds. What this adds up to is quite a photographic challenge. In its initial stages I would hazard that bird/wildlife photography is more difficult than many other forms of photography. I want you to be patient with yourself-this is not easy!
We Want Sharpness and Light
Now what makes an acceptable shot? Simply, we’re looking for as much sharpness as we can manage and enough light to bring clarity to the image. That’s it; that’s where we begin.
Firstly, sharpness. This is primarily a function of two things: stability of the lens and shutter speed. Secondly, light or what we would call exposure in photographic terms. This is basically a function of ambient light in the environment and aperture. Of course as we advance in our knowledge we learn that these factors are all interrelated-as one changes the others change accordingly. But for now let’s not get overly concerned with the technical.
Some beginning settings
One of the easiest things you can do to obtain acceptable images of birds is to shoot during the day when there is enough ambient light. Avoid early mornings, late evenings, or very dark and dreary days. Also, to begin with it is easiest to keep the sun/light at your back-so the sun and your camera are both pointing at your subject. Shooting into the light, where your subject is heavily backlit, is an exposure challenge you just don’t need right now. Also, try to capture birds while they are stationary-perching or standing. Birds in flight pose quite a few difficulties.
Secondly, if your lens has something called Image Stabilization (Canon-a switch located on the lens body and labelled IS) or VR (Nikon-standing for vibration reduction) please turn this on. This feature helps the camera and lens compensate for small movements you make when you snap the shutter. It is very difficult to keep a camera (especially one with a 400 mm lens attached) perfectly still. Once you have this turned on, find a body position, usually elbows hugged close to your sides, that helps you keep the camera as steady as possible. Even trying to snap at the beginning or end of a breath can help.
Another simple step to take which can net us a greater number of sharp images is 1.) to shoot in AI SERVO (Canon Continuous Autofocus-in the main menu under Auto Focus modes) or AF-C (Nikon) with 2.) Continuous Shooting (in the main menu under Drive modes). Even though you are targeting stationary birds, they are rarely completely immobile. These settings tell the camera that we are shooting moving objects and that we’d like the camera to be able to take one shot after another at the highest speed the camera can manage-as long as we hold the shutter button down. Typically, a series of shots like this will contain at least one sharp image.
The next thing you can do is to put your dSLR in the Program Mode (noted as P and located on the main dial on the top of the camera-this is an Autoexposure mode). Fully automatic. Please do not feel that you are not doing “real” photography if you do this. When I first started driving I learned on an automatic transmission-not a stick shift-but I was still driving! Remember, we want acceptable images to get us inspired – not frustration. The fully automatic mode exempts us from having to deal with aperture, shutter speed or ISO at this stage. The camera will make its best guess-and these dSLR cameras are quite intelligent. We’ll talk more about advanced exposure modes in subsequent articles.
Finally let’s talk about viewing your images. You don’t need to invest in any particular software or editing programs at this point. Just follow the instructions of your camera to get your images onto your computer so that you can view them in a larger format. Take note of the shots that worked particularly well for you-and go out and take some more under the same conditions! Notice when the subject is backlit and therefore dark-remind yourself to shoot with the light behind you. Try to puzzle out what you did well and what was challenging. Make a few notes and try again. And if you enjoyed your new focus and the wonder it inspires for these creatures then don’t give up. You will improve.